Saturday, November 27, 2010

We love TEXAS!!


I haven’t posted since last week because we’ve been on a road trip to Mansfield TX this week. In fact we’re still on that trip right now! Driving home as we speak.

We’ve had so much fun here! We drove to TX to visit “Grandpa & Grandma Texas” as my girls say ( my husbands father & step mom). They gave us tours of every where we could possibly go in our 7 days there.
I’d love to share more pics but my connection is so slow in the car right now it’s taking FOREVER to download them. I'll post some later.
Sad to come home , but we’ll definitely come back next year & do it all again!
I have some fun crafty things and a great new easy recipe to post about later next week..stay tuned!

Friday, November 19, 2010

Tasty holiday treat & quick little craft

I’m sure everyone’s going to be busy this week with Thanksgiving plans, hosting family or traveling to see family. So I thought I’d throw this quick little yummy item & craft out there.
I love shopping at Trader Joes. Each time we go I always find a new item to try. Sometimes we love it, sometimes it doesn’t work out. Well this week our pick worked out. This is the best pumpkin butter I’ve ever had!!!
This is like a pie in a jar. We toast a piece of whole wheat bread, spread tons of pumpkin butter on it. To top it off , we add loads of whipped cream….soooooo yummy!!! I think the girls & I have pretty much devoured the jar with in the week. My husband is not a pumpkin pie fan, so that just means more for us. I'm always one for chosing homemade first, but I love when I find something that tastes like it too. If you love pumpkin pie definitely put this on your shopping list!!

Now for the craft…..

This little turkey is something we made 2 years ago. Its something so simple yet has so much meaning. Its also a great activity to keep kids busy while they're waiting to have the big dinner.


We made this out of a styrofoam square & circle. Wrap each with yarn. Stick the body of the turkey with popsicle sticks to mimic its feathers. Cut multi-color leaves out of construction paper. Let each person write one thing they’re thankful for & attach to the stick with tape. Makes a great display on the table for everyone to enjoy, or put it out during the week & have your family fill one out each day until its full.

We put ours away each year, but each pick one leaf to keep on the turkey & add new ones the following year. Its so much fun to see how much the girls have grown, with handwriting & what they’re thankful for.

Have a great Thanksgiving!!

Tuesday, November 16, 2010

Multi-purpose display & catch all

Recently I need to come up with a way to display my totes and “puppy / kitty” cuddles for the craft shows I’ve been doing. I needed something that was easy to cart back and forth to the car & able to give me options to do arrange my display. But the best part….a pleasant surprise! It also makes for such a great entry way catch all! Please read on to find out how.

I looked around the basement & garage to see what I could find. I love trying to come up with new ways to look at an item. So I found wood, molding, a thrift store chair, paint & a coat peg hanger, and decide to whip up this display with no $ spent!!
With all the materials listed above I got to work. First I removed the seat from the chair. Then I painted the wood & the chair white. Next I attached the 2x4 wood pieces to the back of the chair with screws. Then on the front half of the chair I attached the molding with screws as well. That way visually it just looked nicer . At the top I used large screws to attach the expandable coat pegs to molding & 2x4s.
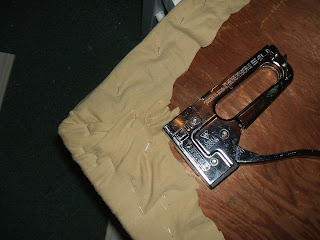
I needed to replace the old seat with some new material. I had a neutral pillow case that worked great. I just cut to size & stapled to the bottom of seat. DONE!

It ended up being the perfect height for the hanging the totes & holding the baskets of cuddles. To my surprise, I hadn’t thought about what a great catch all it could make by the entryway or mud room! I just love multi purpose items!
It takes up so little space. Its so easy to store in the basement when not needed ,but also easy to bring up when you have a party for extra coats etc. If you use it every day why not throw a basket under it for shoes , hats or whatever you might need to store on a daily basis .
Though this was a no cost project for me, it could easily be a  cheap $10-$15 project if you hunt for supplies at thrift stores or even in your own home!

Monday, November 15, 2010

Its here!!! Cake Plate Give away!!! And the winner is.....

Here it is!!! The give away is here!!!! I have given you each a # in order as it appears in the blog follow list. It is as follows…..


1.KellieHolubow. 2. Hoalisw 3. Kimberly 4.Barbra Kruzewski 5. Krista Abbatichia 6. Nicole CoWallis
7. Celistia  8. Barb&Steve 9 Littlegreengardengirl 10.mary-jo 11.Nancy 12. Skippymom 13. Kristin
14. Linda Wildenstein 15.Teresa 16. Sandra 17.Shawn 18.Treehugger31 19. DrHeckle 20. Nubilus
21. Sapphireblue 22. Andrea Padilla 23.Christy Mack 24. Prairie Wind Designs
25. Kate 26. Resweater 27. Tracy DeLuca 28.LyndaB 29. Boom

True Random Number Generator Min:1 Max: 29  Result: 11 Powered by RANDOM.ORG

                                          Nancy!
You’re the Cake Plate winner! Please send your address to me at
                       roundaboutshop@gmail.com
But she’s not the only the only winner here…..Those of you that have posted about my blog give away will also be receiving a “little something” as well! I couldn’t have done it with out your help!!


SkippyMom
Linda in New Mexico
And of course My Aunt!!!

Please email me your address as well so that I can send your thank you gift!! If any one else has posted about my give away, please send me the post & your address so I can send your thank you gift as well !


Sunday, November 14, 2010

Almost time for the GIVE-A-WAY!

Yeah! Only one more follower to go & its time for my CAKE PLATE give-a- way!!!

I’m so happy I’ll be able to give this away before the holidays. It will be such a great addition to the holiday parties coming up .Be sure to check back & to see if you’re the winner!

Wednesday, November 10, 2010

Fun UPCYCLED Christmas ideas!

I just love making old items new. (I’m kind of obsessed with it!) Since I’m on ETSY so much of my day, I started making a Christmas list. One of my searches was specifically for upcycled items. So if your trying to come up with some earth friendly & unique ideas for xmas presents I’ve found some great items to share with you!

Berry Berry Vintage But...

$29.00
contrast black and whit...

$5.00
CUSTOM wee hOOt Hat. a...

$25.00
Day Planner - Let's...

$25.00
French Toile Upcycled 2...

$23.00
Japanese Paper Wrapped ...

$25.00
Navy Computer Circuit B...

$15.00
Olive You Fabric Bangle

$12.00
Small Felted Wool Stuff...

$20.00
Baby Boots, Shoes, Boot...

$21.00
LET THEM EAT CAKE - Vi...

$38.00
Wine Bottle Gift Bag Re...

$10.00
Lambswool Mauve Marsh D...

$13.50
Recycled Billboard Bann...

$18.00
Set of Three Tea Lights...

$21.00


One item I use every time I do laundry is the wool dryer balls. They are great! And on a side note, my cats also LOVE them! They are always hang around the dryer on laundry day waiting for them to fall out. They can chase those things forever! There are not only made from upcycled sweaters but they help dry your clothes up to 30% faster & help cut down on static. Click on over to the The Big Red Barn to get your own.

I am always working to add more upcyled items to my own shop as well. That’s what got me into selling on etsy in the first place! I’m excited to show you what I just recently made for our entry way! I will be posting on that later……..

Happy shopping!


Saturday, November 6, 2010

Green idea for old books.....

I just love old books. Especially children’s books. The colors & illustrations are always so fun. When ever I’m out thrifting my next new find, I always see so many of these great books. Many are not in such great shape, but they still have a “life” in them yet!
Here’s a idea that takes hardly any time at all but becomes a useful product in the end.


You’ll need…..old book of your choice, drill, and a clock mechanism . You can either by a new clock mechanism at a craft store, or even better find an old clock at the resale shop & use that one instead (its cheaper too!).
Drill a hole in the middle of the book .You’ll need a drill bit that matches the width of the clock mechanism. Its best to place a piece of wood under the book so that you can drill completely through it. Hold the book down & in place so that it doesn’t slip away while you drill. This will insure a clean drilled hole.

Next place the clock through the hole & assemble the arms. Your book clock is done! Now its time to find a place to hang it. If you want, only drill through the front cover. You’ll then have the option to stand the book open to display it on a shelf or desk.

With so many books to chose from its easy to find one to match your décor. How about a cook book clock for the kitchen? Or maybe sweet vintage baby book for the nursery? The possibilities are endless!

Wednesday, November 3, 2010

Short and Sweet

This weeks been crazy already! I think the holiday shopping has started & its keeping my etsy shop busy this week. But before I run off to the post office again I want to post this pic I found on the fridge.
I don't know if any of you remember the post I had a while back about making a message center ? Well this has paid off! Its nice to see what the girls leave on their spots. Some times it's just doodles but when I found this,  it just made me smile :)