Thursday, June 23, 2011

Hearts Thursday

I always look forward to sharing the hearts I find each week. Here's a heart smudge on my floor. Sometimes dirt can be pretty :D


 This week I also wanted to share a few of the amazing hearts you have been kind enough to share with me!! It's like a big hug when I see an email that reads "I saw this heart & thought of you!"  I told you ......once you start looking for them its hard to stop!!
Thank you Kristy!!

Thank you Allison!!

Thank you Shell!!
I have to try this hard boiled egg heart! How much fun would that be to serve up :D

For more great hearts around the world visit.....


Monday, June 20, 2011

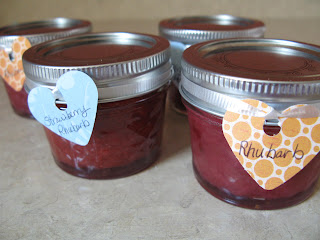
Strawberry Rhubarb Freezer Jam

One of the best things about summer is fresh fruit & veggies! I absolutely LOVE rhubarb & look forward to it every year. Its only around for such a short time & I had to make some freezer jam so we can enjoy it all summer long.
I’m no expert on jam. In fact I don’t even use pectin…..just straight up fruit & sugar! But every batch has turned out thick & delicious. So simple & makes a hostess gift to bring along to your next summer cook out.

3 cups of rhubarb
3 cups of strawberries
2 ½ cups sugar

I’ve made this both from frozen & fresh from the garden & have had the same results. Always nice & thick! If using fresh from the garden, you may need to add about a ½ cup of water.Also my recipe uses less sugar then most recipes call for. But you can always add more if sugars your thing :)
Add all ingredients to large pot. Heat to a boil, stirring continuously. Boil for about 5 to 10 mins.  You want the the fruit tender & able to be mashed well & sugar desolved. Now remove from heat. Using a potato masher blend the fruit & sugar together.
If your using a glass container make sure it has no “shoulders” and has a wide mouth. Always leave some room at the top to allow for expansion in the freezer as well. After filling the jars I place in the fridge to cool, then place in the freezer until ready to use. Store in the freezer for up to 6 months & in the fridge for week when defrosted, or using fresh from the pan.
Don’t forget to label them !


Friday, June 17, 2011

Time to wash the dog!

As promised I was going to share with you my review on ECOSTORE's Pet shampoo. Lucy is in need of a hair cut, but I thought I should try out the soap while she has all her hair. I was curious to see how it would work with all her fluff!
In the tub & ready to go!!
Getting all scrubbed up!
Her favorite part? Getting blow dried!

How did the shampoo do?

 I really liked it! It has a great smell (kind of like baby shampoo with a herbal touch) & left her fur super soft & fluffy! Its been a few days since her bath and she's still soft & smells "pretty".  Lucy does have seasonal skin allergies & I'm excited to see if over time this will work for that as well. This shampoo is sulfate free, soap free & tearless! I only had to use a small amount to get a good scrub, so this bottle should last me quite a long time too.
 Check out ECOSTORE if you'd like to give it a try!

(This is my own opinion of the product. I was only given the product to sample for myself & not paid in anyway :D)


Wednesday, June 15, 2011

Pardonnez-moi s'il vous plaît !!

I have missed my travel Tuesday post (its Wednesday!) …. I haven’t practiced my French AT ALL ( in less you count the title of this post!) and I’ve haven’t checked in to all the fun things that you all have been up too! Now I remember the reason I started my blog when the girls started school….I had time to post & keep up! I’ve got a whole half hour right now, so I have a little project I want to share & then I’m off to check out what all of you have been up to!!
Here’s a cute idea to dress up a plain tote....

All you need is some fabric markers, a stencil (or free hand a design if your able) embroidery thread, embroidery ring, tote & a sewing needle.
Decide where you’d like your design to be on the tote. Hold stencil in place & begin coloring in the colors of your choice. Let dry. Now place the in the embroidery ring.
Pick your color thread & begin to trace around the area with the thread. I used the simple pattern ……
I think it gives the tote so much personality with out a lot of work!
With all the different stencils out there the possibilities are endless!
And if you don't want to go to the trouble to make your own, you can always stop by my shop & order your own  :D

(P.S I have been having some probs. commenting this morning. It keeps leaving my comment multipule times on the same post! Sorry! Don't you just love blogger !)

Friday, June 10, 2011

We interrupt our regularly scheduled post…..

A few weeks back I was contactedby ECOSTORE to do a review on a few “GREEN” products. I was more then happy to try them out !! I was able to pick 2 items from the product line. I chose toilet cleaner & dog shampoo. Today I’ll be reviewing the toilet cleaner.


One of the things I hate to clean the most are our toilets. We have hard water & it’s such a pain to clean them. So I tried it out.
Before……
See the hard water stains?
After……..
Much better!
It worked pretty good! I let it sit for about 5 min.s so it could work its magic. It took off the hard water stains. The best part is it’s all plant based. No harsh chemicals! On the back of the label it mentioned it also works great on stainless steel.  So I tried it out on our sink........
Worked great on it too! Nice & shiny!
Want some of your own ? Visit ECOSTORE   & You can check out their Twitter & Facebook page as well :)
Next week I’ll share my review on their pet shampoo.
Lucy's so excited :D

(Just to let everyone know...This is my own opinion of the product. I was only given the product to sample for myself & not paid in anyway :D)


Thursday, June 9, 2011

Thrifty Thursday........Rose bud pinata

After looking at all the piñata choices at the store ( & their prices!) I decided to make my own for my daughters party. I can't justify spending $20 or more for something they're just just going to destroy!!


All you need is news paper, white glue, a balloon, streamers, green tissue, tape and some strong string.

Blow up the balloon & tie the string to it. Tear up news paper into small pieces. Mix equal parts of white glue and water in a small bowl. With a paint brush wipe glue on the balloon, then press the news paper on to it. Continue layering glue & paper until the balloon is completely covered. Make sure you leave a small open space on the balloon so you can have a way to fill it with candy! Let dry for 24 hours. If when dry you feel it needs to be stronger, add a second coat of glue & paper. Let completely dry again. Then pop the balloon inside.
Gather your prizes and candy & put it in the hole that was left open.
Now its time to decorate!
(You may want to reinforce where the string is tied, so when the kids hit it, it won’t drop to the floor! I just used some packaging tape.)
I just used some streamers, green tissue, and tape. Tape the end of the streamer to the top. Roll the streamer around gathering & taping as you go.

When you’ve reached the bottom gather some green tissue & tape it to the bottom.

That’s it!  Total cost for this project $9.50 .....$1 for streamers & $1 tissue(with lots of both left over for the party) , 50 cents for the glue, $6.99 for 2 1/2 lb bag of candy & prizes, and the news paper - free!
Now look out …..the kids will be knocking you down to get their chance to hit it!!
Remodelaholic 


Hearts Thursday!!

Just one heart this week.......

This was on the inside lid of our turkey lunch meat! The sandwiches I made for the girls that day were filled with a little extra love :D

For more great hearts around the world .....


Wednesday, June 8, 2011

Barbie Princess Cake


This cake looks impressive but it really is not very hard….I promise!!
I got the directions from http://www.bettycrocker.com/recipes/fairy-tale-princess-cake/994aa183-c7da-4b14-8435-7472c513feaf?parent={FFF8E2A1-7525-4562-915D-1B743BC01649}&gp={EC022BB0-909E-4B64-BE40-42D2A671702C}
Though mine did not go quite as smoothly as the tutorial, it did work out. The best tip I can give is make sure you have bowl large enough to bake the cake. It makes it tall enough to place the Barbie inside. My Barbie was a little too tall, but nothing a little frosting can’t solve!! I just had to build it up until it looked in proportion to the doll.

We used a Barbie she already had, but I think it would make such a great gift for a little princess :)Imagine getting your cake & a Barbie too!!

Tuesday, June 7, 2011

Travel Tuesday....St. Louis MO

Back in November we took a road trip to TX. It’s a LONG drive from here & had to make a few stops on the way. The first stop ….St. Louis!
The only thing I know about St. Louis is the “Arch”. We were so excited to go up inside it! The girls couldn’t believe you could actually go inside. I had to agree. It looks way to narrow to actually go up it.


It was a 4 minute ride to the top in a TINY elevator. I would call it more of a pod! Very small & only 5 at a time. NOT FOR THE CLAUSTERPHOBIC!!
Can you even see the tiny windows at the top? They're in the middle of those branches.
Heres the girls standing next to those tiny viewing windows!

Once you’ve reached the top, you enter the viewing area. It is also very narrow. You are actually walking on an arched floor as well. Here's some views from the top.......


A few fun facts…..
The Gateway Arch is 630 feet tall, making it the tallest national monument in the country. It is also 630 feet wide at its base and weighs more than 43,000 tons. The Arch is heavy, but it moves. It was designed to sway with the wind. It moves up to an inch in a 20 mile per hour wind and can sway up to 18 inches if the winds hit 150 miles per hour!!!

Then it was off to lunch......
And we had to see their baseball stadium…..
That’s my little “CUBS” antenna guy smiling at the Cardinals stadium!! :D
We will be going back soon. They have a great kids Museum that we didn’t get a chance to check out yet....
Hard to tell from this pic, but see the bus hanging off the roof?! Theres a whole outside area for you to climb threw a series of tunnels & slides galore!! Can't wait to go back!

Monday, June 6, 2011

Princess Party!

This past week I spent every moment I had available working on my daughters birthday party. She turned 6 and had her heart set on a “Princess” party with a “fancy” lunch! What is a fancy lunch for 6 yr old girls you ask?


Mac and cheese & hot dogs of course!! That was the easy part of this party :)

Games, rainbow cupcakes, Barbie princess cake, rose bud piñata, giant paper carnations were just a few of the things I had to make on my list last week. Oh & not to mention we decided to move the party in to the basement the day before since the weather called for scattered storms and a high of 90 degrees on Saturday! So I spent Friday night cleaning up, decorating the basement in between making the Barbie cake & all the last minute details.

Over the week I’ll share a few of the fun projects I did for the party, but for now here’s a few snapshots of the day………


One of the most fun games we played was "dress up for the ball" game.You should have heard the giggles!!


After all the work & all the fun I was so tired by the end of the day!
But it was totally worth it!
That face says it all .......