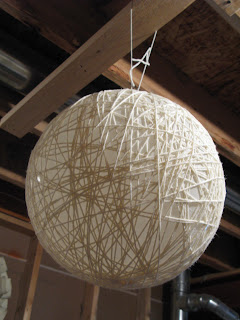
I found some yarn at the thrift store last week. Just $.075. Much to scratchy to make anything I’d want to wear from it. I bought it for the girls to use for misc. craft projects (they can really use up my yarn stash!). Then I saw this globe lamp. They suggested using yarn dipped in fabric stiffener. But I had white glue on hand & thought I’d give it a try!
All you need is some white glue, yarn,& large balloon.
Make sure you have a space you can make a mess. This project is SUPER messy! Blow up the balloon. In a bowl, pour one container of glue.
Slowly add water to the glue until it becomes a soupy texture. You don’t want it too thick. It won’t soak into the yarn well.
Using a foam brush cover the balloon with glue mix. It just helps the hold the yarn as you start to wrap it. Now get your yarn ready & began to wrap around the balloon.
Every once in a while stop and fill your foam brush with the glue mix. Spread it over the yarn. Repeat this process of wrapping and gluing around the balloon until it your happy with your pattern & thickness. Make sure all the yarn is soaked in the glue.
Now tie it up some where safe to dry. Mine was dry with in 24 hours, but I gave it an extra day just incase. When it’s dry pop the balloon & remove it from any open space in the yarn.
To use this as a light you’ll need bulb unit. I had one already from IKEA ( super cheap-$6).
Then to help keep the bulb in place, cut a slit in plastic lid ( a butter dish lid or Pringles chip lid works well ). Slide the wire through this slit. Place the whole unit with bulb into yarn globe. If you can’t move some yarn to make space, you might need to cut a small area & slide it through.
Plug in ! I have no idea where I’m going to use it. But here is a few areas to give you an idea of how it could look in your space…..
Such a fun project & I love that it actually worked out too !!


31 comments:
Now, this is impressive, Trisha. Of all the crafty things you've shown on your blog, this one is the shizzle. ;)
I bet your girls each want one for their room, in pink, of course. :)
this may sound bad but- we made mini versions of this for ornaments when i was in preschool! (then covered them in glitter) my mother STILL has it and hangs it on our Christmas tree
This is just a fantastic project, you have so many inspirational ideas!
Oh, that is so cool! You did a great job with it!
It looks really good in the bathroom. Like a moon among the trees. :)
Wow! I learned how to crochet last year and I have a lot of yarn. I've been wanting to crochet new pot holders because I love using them in the kitchen. My 16 year old daughter might love one of these in her room, plus she could make it herself. Fantastic idea.
Trisha: I saw a picture for almost the same thing. It gave me the idea to make easter eggs the same way for the school I work at. Even though the eggs were cool, this light would be cooler.
Looks great.
Amazing. I love the idea.
That's really nifty! Thanks for sharing your crafty idea. It turned out beautifully.
That's SUPER COOL!!!
What a GREAT idea! I love this! Definately something to consider doing... and my eldest wants a new lamp for her room!
What a very cool idea, and I'm guessing you could make these in all sorts of sizes. I'll keep this in my favourites for future reference. Thanks for sharing.
Wow, that is so cool! I might have to try this one...
Very nice--I really like the soft glow of the light through the yarn. Great tutorial, nice to know it works with glue as well. Thanks for linking to my Share the Love link party!
Mary
Totally cool! I love it hanging over the table!
So creative and pretty!
Wow! That is incredible! I love that it looks like a million bucks and yet when you broke it all down in your great tutorial you showed just how easy and inexpensive it really is. Thank you so much for linking this up to Inspiration Friday this week!
Vanessa
That did turn out so cute!!!! Love it. Thanks for stopping by my blog! I'm following you now. So funny though that my kids and I are doing a balloon and "glue" project tomorrow. You'll have to stop by sometime next week to see what we're doing! ;) I'll give you a hint--I'm sure you'll figure it out--It's Eastery. Have a great weekend!
Sooo cool! I have always wanted to make a yarn globe, but I never knew how! Thanks for the tutorial and the inspiration!
I am featuring you on Spunky Junky tomorrow!
xoxo
Halsey
Phenomenal! I've done these before with no light. Duh! Why didn't I ever think to do this!? Thank you for the inspiration!
This is amazing. I would've never thought that was made out of yarn. Incredible job.
I love this idea! I'm going to see if my daughter will like it because this summer we are making over her bedroom and this would be perfect! Thanks for sharing! I'm a new follower and thanks for visiting my blog too :)
Fab idea! Gonna have to pull out some yarns and try this one!
Michael
bluevelvetchair.blogspot.com
hiya , wow i love this tutorial and i have peeked at some of your other creations too , so now i am your newest follower and i hope you will visit me soon , happy crafting
xmaggie
Trisha-
We loved this project, and it was our FEATURE PICK for this weekend's Saturday Spotlight. CONGRATS!! We'd love for you to stop by and grab the "I've been featured button" located on the right sidebar ~ www.sasinteriors.net
xo
Jenna, SAS Interiors
Jenn, Green Door Designs
I will be featuring this cool project at my party tonight. Thanks so much for linking up last week. Please stop by and grab an "I've Been Featured" button.
That is so crazy...I've never even seen the Better Homes and Garden issue or your post and I'm making a similar thing!!
Using twine and a punch ballon...I made my son an elmo pinata with one...
I'm making 3 with a string of lights..I LOVE what you did:-)
Gonna Pin it!
This is so Amazing!!! I am so going to do this. Thanks for sharing!!
Hugs, Anne
Wow! This is more than AMAZING! It looks like it came from a high-end store. I hope you will make more posts similar to this as I am a DIY lighting lover :) I also checked on some of your other DIY projects and I must say, you really are talented! I'm envious! Haha
LOVE this project! How FUN!! I can't wait to try it!!
Thanks for your blog.....going to use it with my students
Hi! I made one last year with wallpaper glue but after a couple of months it started to fall down.
Like the round effect did not hold. Is it solid with the regular glue? I use to put a humidifier in my room, maybe it's the reason why but just asking how long you can keep that kind of lamp?
Post a Comment