Friday, April 29, 2011

Attaching the hanging light

I almost forgot to post about how I attach the overhead light at our “snack” table!


This is a table the girls do their home work at, have their snacks & we sometimes even eat dinner at. We have a larger table in our dinning room but for some reason we all gravitate to this one. So a light over it had become necessary. Though I wish we had a ceiling outlet, I had to work with what I had…..just an outlet on the bottom of the wall. So I came up with a way to hide it the best I could.

This was a cheap project as well- hanging light-$6 (ikea) cord holder-$2 (ikea) corner molding-$2.39
ceiling medaillon-$5.99 ......whole project under $20!! Not bad :)

I had the light fixture already but had to figure out the where to hang it on the ceiling & the height I wanted it. I used a 3M hook for the ceiling & taped the cord to the wall to hold it in place

Then I used some corner molding, attached 3M foam adhesive , placed the cord along the wall & stuck the molding directly on the corner. This held the cord in place & hidden.

Then to make it look like an actual fixture I added a ceiling medallion & a cord strip.

The medallion needed to be tweaked a bit to make it fit over the cord. I just sawed out a little notch.
Then using a little hot glue I secured it to the ceiling. Then I just placed the cord into the cord strip (Ikea -$2) . It has a removable sticky strip on the back that holds it to the ceiling. Keeps the cord straight too.

Next I needed to “pretty” up the medallion to hide the hook. Using my circle cutter & a sturdy paper plate, I made a piece to fit the middle. Cut a circle, then cut a slit to the middle.
Squeeze the plate over the cord & hook allowing it to fold over itself to create a cone shape. Because I made the circle slightly larger then the space it filled, it held itself in place .
Before.....
After....
That’s it ! Done!


I painted the molding to match the wall & the top to match the crown molding.


I still need to caulk the molding but the hard part is done!! It blends right in :)


Thursday, April 28, 2011

Heart finds this week......

Well I only found 1 heart this week........

A bath time hair heart!
After covering herself in finger paints it was off to get cleaned up. When I pulled her hair up to stay dry (the only part not coverd in paint!!) I noticed her hair had formed a heart :)

Hey, finding 1 heart is better then none right ?


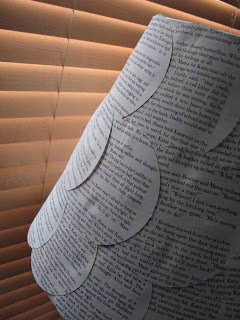
Thrifty Thursday......Book page Lamp

I’m always looking for ways to use book pages. Don’t get me wrong….I LOVE BOOKS! But when you can pick up used books for pennies its just too much fun to tear them apart!
Here’s a super cheap & unique way to make a great “reading” lamp shade. The total for the shade & book cost $0.70 !!
You’ll need an old book, shade, circle cutter, and some Mod Podge.

First tear out a stack of pages. Set your cutter to apox. 4 inches. If you don’t have a circle cutter you could always trace a plastic lid (but the project goes so much fast with it !).

Apply your glue and start to layer. Its important to get your layers lined up & even (found this out the hard way!) That way when it’s lit up there’s a nice pattern.
I started at the bottom & then made a row on the top. Then I moved on to the middle. Depending on the size of the shade will determine how many rows you will need.

That’s it! Place it on your lamp & light it up!!

I really love the pattern & warm light it gives.
It even looks pretty nice when the light isn’t on too  : )


Wednesday, April 27, 2011

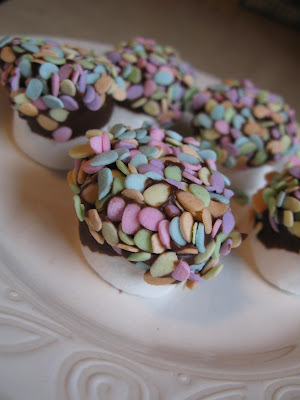
Marshmallow Bouquets

We love these easy sweet treats! Fast, easy & so yummy!

You’ll need marshmallows, (have you see they even make GIANT size ones now? I might use those next time!), semi sweet chocolate pieces, colorful candy sprinkles & and toothpicks.


Stick the toothpicks into the marshmallows. Melt your chocolate, then holding on to the toothpicks dip the marshmallows. Then quickly dip & roll the chocolate tops into the candy pieces.


Place on to a plate & place into the freezer for a few minutes to harden the chocolate.
When ready, remove the toothpicks & place back on to the plate.

Watch out….you might get knocked over by the crowd trying to get one!!!

Tuesday, April 26, 2011

Travel Tuesday.....Palace of Versailles

A few highlights of the Palace….


Something I found interesting.....Marie Antoinette's husband, Louis XVI ,  had a bedroom right behind hers. When he felt like it, he could come an visit her through a door located in a wall. The door completely blended into the wall.

I’m sorry the photo above did not come out clear, but it has a story behind it. In the painting Marie Antoinette & her children are shown sitting near an empty crib. We were just told the reason by our tour guide it was to remember the child she had lost. There was a small ray of light streaming in the room at that time. When I got home & printed the photo I notice the reflection of light only appeared over the empty crib.  Very interesting. But for some reason it gave me a warm feeling :)


View from the bedroom

The gardens go on forever. The statues and fountains are amazing. But here's a tip. Want to see the fountains actually displaying with water? Check the schedule first.
They only run them certain days
 & at specific times :)


Monday, April 25, 2011

Plastic eggs? Now what?

Have some plastic eggs left over from yesterday? Have a cat or dog ? Heres a great way to use those left over eggs.
For your cat......
First make sure your plastic eggs have little holes in the top or bottom. Most do. And some even have holes on BOTH the top & bottom. Then open your egg. Take some dried catnip a crumble a few leaves into the egg & snap closed.

Now toss them to your cat!

They'll LOVE you for it!! My cats played forever!
Until the fat one just couln't take it anymore & did this.....


For your dog....
Use the same kind of plastic egg, but this time add a yummy treat inside! Our dog Lucy went nuts for this egg!
But I wouldn't recomend this to a dog that will eat EVERYTHING & anything. Luckly ours just plays & rolls the egg. After a while we opened the egg & gave her the treat. But she seemed to have fun rolling around the floor with it for quite a while  :)


Sunday, April 24, 2011